The countdown is on until we have our second child. There seems to be so much to do and so little time. I do wonder constantly about the impact that this will have on our son (currently 2yrs and 3months) and also my relationship with him.
Last night, he lifted my top to look at my tummy, pointed and said "baby girl in there". (Note we have not found out the sex of the new baby, but Mr2 just seems very set on this 'fact'). He gave my belly a kiss then said "Night, night. I love you!" while waving to his little sibling.
I think I have been grinning all day at the thought of it. Little children can say and do the most beautiful things! I think we're going to be just fine ;)
Thursday, November 26, 2009
Tuesday, November 24, 2009
Incalesco is turning 1
This Friday is Incalesco's first birthday. To celebrate I am offering 10% discount to you my blog readers.
To receive 10% discount off any item in my store simply enter the code "Blog Reader 10%" at the Etsy checkout in the Notes to Seller.
*You must follow my blog to receive the discount.
*Offer valid until 27th November.
*To receive the discount either wait for a revised paypal invoice, or pay the normal price upfront and I will refund the difference via paypal
Shhhh, please don't tell anyone....
Erin from Inner Earth Soaps is currently running a giveaway of a 3 month soap subscription.
The fewer people who know the better chance I have of winning so please keep this to yourselves! It's probably best you don't bother entering, as the soaps are really destined to be mine!
But if you have read this far and are really determined to win MY soap subscription you can enter by following the instructions at Erin's blog.
Tuesday, November 10, 2009
Art Deco Inspired
It has been on the backburner for a little while, but I have finally had the time (and the silver) to continue on with my Art Deco starburst/snowflake inspired Topaz pendant. I first introduced you to this pendant in September when I made the bezel setting.
I have now transferred the design which my hubby tidied up for me to the silver and saw pierced the design.
As much as hubby would like me to have stopped at this point, a sterling silver 'ninja star', I had other ideas!
The following image shows the components layered together and the scale, as you can see this is a pretty sizable piece, it will be a real statement piece of jewellery when completed.
After cutting down the bezel to the correct height it was time to place and solder it.
Due to the volume of silver in the piece it took a considerable amount of time to solder. If any part of the piece is allowed to cool the heat quickly dissipates preventing the solder from running.
Now it needs to be tidied up and the bail attached...
Sunday, November 8, 2009
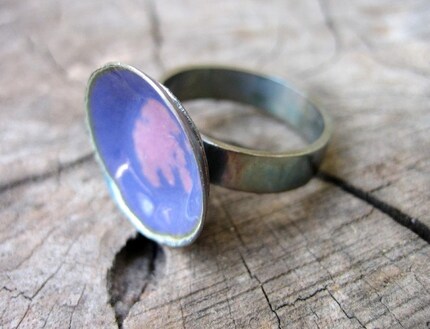
A grand unveiling - enamel ring #1
Hooray, this weekend has been most productive (and we still have a few hours of sunlight!). I am very happy to be able to show you the first of my enamel pieces.
I have called this ring "Full Bloom" as it is reminiscent of the big bold roses in my front garden right now.
This ring involved a bit of experimentation, and a fair bit of luck ;) I started by first constructing the ring.
In some of my enamel test pieces I found the enamel was cracking. I had a theory that this was because I was allowing it to cool too quickly. As I had not yet perfected the torch fired enamelling and was moving on to trickier pieces with solder joins I did some extra reading. A tip that I picked up was to anneal and pickel the piece at least three times, this will prevent any potential movement left in the metal and also protect the solder from running again (hopefully!).
After annealing I cleaned the inner dome with a brass brush and let it air dry, this was to prevent any oils from my fingers contaminating the surface. I 'wet packed' the flame red enamel so that I could get it to sit up the walls of the dome.
After allowing the red enamel to dry for a couple of hours I added the dry buttercup yellow enamel.
Time then to cross my fingers and fire. I am really happy with the end result, it is available now on Etsy. Keep your eyes out in the coming weeks for some new enamel pieces in a fab range of colours.
Subscribe to:
Posts (Atom)