Friday, October 15, 2010

Salvage Operation

Things don't always go to plan, sometimes they melt or collapse or just aren't quite right.

Last year I was working on a ring with a princess cut amethyst, everything was going perfectly... until... late in the afternoon in a rush to get finished I was too impatient and cracked the stone while trying get it to drop into the setting.

Yes we have these setbacks, and while it is very disappointing, all is not lost. If you can still salvage the piece it is a wonderful thing. In this case the ring and setting were fine, so it was just a matter of waiting until I bought new stones and trying to source another stone to fit.

Fast forward to a year later and I had cause to place an order for gemstones. Luckily I remembered to check the princess cut stones of aproximately 5mm square.

So finally... the Knife Edge Ring gets to see the light of day, with a lovely princess cut peridot.

Friday, September 17, 2010

Techniques and Technicians - Wire Wrapping

Wire wrapping is a technique that involves the use of tools such as pliers, mandrels, vices and hammers to bend, twist, bind and forge. The intricate patterns and shapes are achieved without the use of solder.

I am drawn to the rather romantic and ornate designs that people achieve with this technique. As with other jewellery techniques, people who practise wire wrapping develop their own distinctive styles achieving varied and unique results.

Three of my fellow jewellery artists on Etsy have kindly shared with me some info about their creative process using wire wrapping.


Angelene


I love wire wrapping. It's mesmerising. The feeling when a large piece has been completed is one of achievement (and sore fingers!). My wrapping style definitely reflects my personality - measured, careful and meticulous.


I first started wrapping unhammered wire for a pair of long drop earrings - because I hadn't hammered the wire first it was not hard enough and so after wrapping the whole length it bent, and ruined the pair of earrings. An expensive mistake that I haven't repeated! Gradually my wrapping has become more precise, and I can wrap in small spaces (such as the top of a loop of a wrapped briolette gem) which gives a neat but detailed finish to my work.


RiverGum Jewellery

I discovered beading one afternoon when my niece arrived from Perth with a few beads, headpins and ear wires. I then did a short two-hour course at the local bead shop learning how to shape eye pins and link beads together to form a necklace and earrings.

I was hooked right from the beginning. That was 7 years ago!


I actually don’t remember where I saw wire wrapping for the first time but I learnt my basic techniques from various tutorials on the net and in books and magazines. I soon left them behind as I developed my own style.


It took a long time to understand the wire itself – the descriptive words of gauge, hardness, square and half round etc, were like a foreign language to begin with.

And now it seems intuitive. First I choose a gemstone to work with and an idea begins to evolve. Instinctively I decide which wire to use – half hard or dead soft. I love the feel of the wire in my hands. It’s almost as if it forms itself rather than me deciding the look I want. I love the adrenalin rush as the piece begins to take shape and I wonder if it will come together in the end. Some of my best work has been when I needed to resurrect what I thought was a disaster!


And of course there is the joy at the end when a customer is drawn to a piece, reads about the particular gemstone and exclaims “that’s just what I need in my life right now!”


Realisation Creations

I loved using wire the minute I started experimenting with it. My first wire wrapped pieces were extremely simple, but as I started to push myself creatively, I started realising that instead of beads being the components, and the wire just being the connective material, that wire wrapped with beads could form an independent component.


I love the texture created when using wire - whether wrapping over another gauge of wire, or creating teensy charms - it's fascinating to me that such an industrial plain looking material can be converted to something so tactile!


I suppose my style of jewellery is quite Victoriana, and a little bit gothic. My love of Tim Burton, period dramas, and historical fiction certainly leads me in that direction! But I am a little like a hummingbird, flitting from genre to genre in search of inspiration.

Friday, September 10, 2010

This is not a cooking blog...

But who would be able to resist sharing such cuteness? For his third birthday our son got some cooking utensils and silicon cake tins from his Aunty Relle and her In-Laws. I think he looks super gorgeous in his apron and hat!


And "Granny's little sister Aunty 'ron" (Veron) gave me a baking book that she had bought for herself, but thought might get a bit more use at my house. So today we made old fashioned gingerbread.


Mr 3 loved stirring and pouring and turning off my electric mixer. Turning it on however is a bit scarey ;)


He loved using his spoon and 'spatchla' to stir and scrape.


The recipe made quite a lot, in hindsight I should have halved it. As well as gingerbread men we made 12 gingerbread stars and a gingerbread bear.


I had to guess a bit with the timing as they were all different sizes, after 15 minutes instead of the documented 25 I thought everything looked about right.


Sadly the gingerbread bear fell apart when I was taking him out of his cake tin. So we ate him warm and he was delicious!

It's Shaun the Sheep!

As you get older birthdays become less and less of a big deal. Luckily I have a couple of kids to live vicariously through ;)

Every year I look forward to J's birthday, normally selecting which cake I will make him well in advance. Now he is a bit older of course I have to let him have a say too.

This year I got the ABC Kids Cakebook from the bookclub at work, so for his third birthday (just before we went on holiday) we selected Shaun the Sheep.

It looked simple enough, get some soft icing and dye it black. Hmmm, seems it made me black long before it did the icing, oh well...


Finally the icing turned black, after about half a bottle of black food colouring and I was ready to shape my body parts.


The completed Shaun cake required 2 cakes so I decided to make one plain and one chocolate. Time to cut out the body.


As all big kids know, the icing is the best part of the cake. This cake requires meringue icing. Yummmmmmmmmmy!


As the meringue icing doesn't keep long I had to make it just before the party. Assembly always takes longer than expected, got him made just in time. Not a bad effort hey?


Shaun was a big hit and our "big" 3 year old was very pleased with him.


Sadly the problem with character cakes is you have to cut them up and eat them! Hmmm seems a bit wrong LOL....


Just under 6 months until A's first birthday, perhaps just a little too early to select her cake.

Friday, August 13, 2010

Mini Masterchef

I got a call from Daycare the other day saying that as of next week they want to move my son to the pre-kinder room. While we were talking the carer mentioned that he had invited everyone to the blue house (our house) and when asked what they would do there he replied "Bake cookies".


Most fridays I bake something with my son, often it is for a playdate, but other times it's just because. I figure by making our own cookies I have more control over ingredients, additives (the dreaded numbers) and can hide other healthy bits and pieces in them too. And aside from all that, it's a fun activity for both of us!


Today we made oat and coconut crisps. We decided to be a bit decadent and put a dark chocolate bud on each one.


The end result, ok they look like eggs! But they taste delicious!

Wednesday, August 11, 2010

Chase the sun

Last week I showed you my new frangipani earrings which were a precursor to a special order.

Today I am happy to be able to show you the main event so to speak.


I still find it incredibly difficult to capture the true beauty of such stones, I think they are much more fabulous in real life.


These frangipani earrings with claw set peony pink topaz are already on their way to a good home. But if you are interested in a custom creation of your own don't hesitate to contact me.

Tuesday, August 10, 2010

Techniques and Technicians - Enameling

I have been nurturing an idea of a series of posts exploring some of my favourite jewellery techniques and technicians.

Techniques: A practical method or art applied to some particular task

Technicians: Someone known for high skill in some intellectual or artistic technique


As a lover of all things colourful I thought a nice place to start would be enameling. Enameling is the art of fusing glass to metal, used in combination with other jewellery techniques the possibilities of enamel seem limitless. One of my favourite books on enamling is The Art of Enameling by Linda Darty.

Three of my fellow jewellery artists on Etsy who also have a love of enamel have kindly shared with me some info about their creative process using enamel.
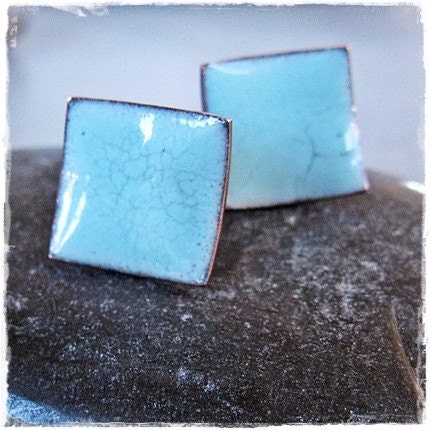
Jewelry by Natsuko

I began making jewelry over 10 years ago. From bead stringing to pearl knotting, wire wrapping… I tried many different techniques. But it was always with beads that I bought from somewhere. I wanted make beads and focal myself. I wanted my jewelry to be truly *ME* So I took polymer clay class at local art center.


While it was fun to make stuff with polymer clay, I felt it really wasn’t for me. It’s just so hard to make finished product look nice & professional. So I moved onto enameling class and I was hooked! Why? I’d have say that because enameling gives you an instant graphication. And possibility of color combinations is endless.


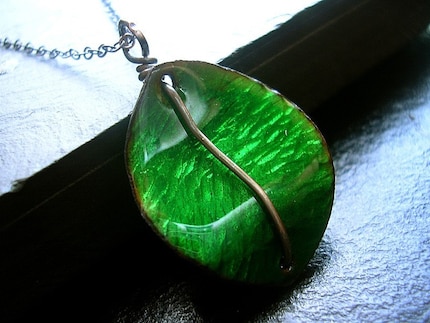
I never run out of new color combination that I want to try. And because enameling is applied over metal, I can enjoy the shapes & texture of the metal too! Although you can do many things with enameling, my focus is to make jewelry. And now I am taking a metal smith class to seek new ways to incorporate my enamel pieces into jewelry.
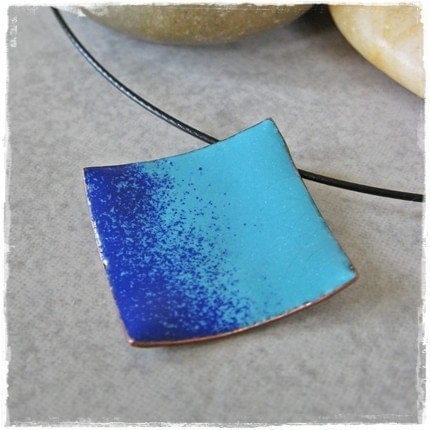


The Sour Hour

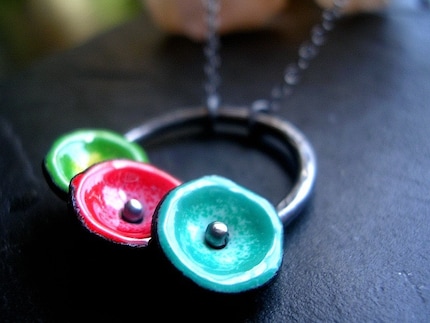
Inna Peck : The Sour Hour : Reversible Enamel Jewelry

I am from Ukraine, and have a BA in Printmaking and Fiber Art. Having a background in printmaking and an interest in Jewelry and metalworking, I took a screen printing enamel class and the teacher really set me up with a good understanding of how to utilize processes and layering techniques to achieve a range of effects.


I am really new to glass, so I I am still trying to learn its capabilities and limitation through taking flame working and fusing classes. With my jewelry I try to use and layer patterns that reference traditional folk art designs but have a contemporary simplicity. I recently received two separate scholarships, one in engraving , and one in glass. I imagine that both of them will significantly change and improve my approach in the near future.


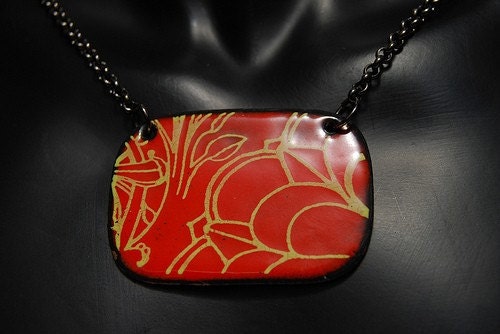
Currently my work is primarily opaque glass, but in the near future I hope to incorporate more engraving, transparent enamels and more complex shapes.
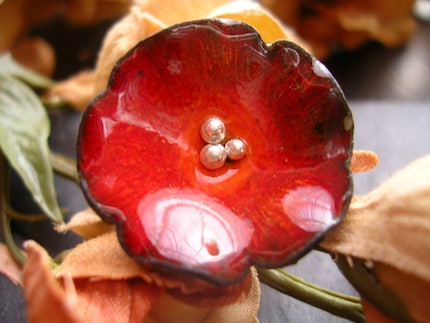


RMD jewellery

I discovered jewellery making a few years ago when my daughter started school, initially I was self taught in beaded jewellery making with a desire to move into metalworking. In 2008 I started attending workshops and weekend classes on silver smithing. In 2009 I attended a Goldsmith School in Brisbane one night a week and am currently continuing that training one full day at a Goldsmith School in Sydney since we moved here in Dec.


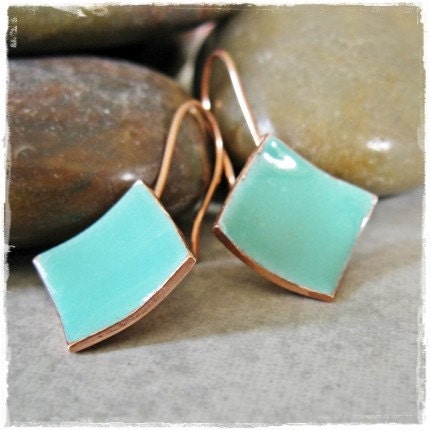
I discovered enamelling in Dec last year when I was looking at ways to add colour to my jewellery without the cost of stones, I was and still am, fairly hesitant to buy and set expensive stones as a beginner. I came across an article on torch firing enamel and found a great Aussie site that sold enamels in small quantities, enough for a trial of torch firing. I spent nearly 4 months testing and trialling torch firing enamels before successfully creating a gorgeously simple pair of drop earrings and from there the obsession began. A few months ago I purchased a microwave kiln which mimics the behaviour of a larger kiln but on a small scale.


I love working with metal and adding colour. Watching the enamels glow when they melt and seeing the lovely effects that can be achieved, each piece is an enigma and no matter how many times you work with a design or a colour, enamels always surprise you with their results. I love that, makes each piece, even the repeated designs, unique in their own way.


Aussie readers can check out Rachel's newer work at Shop Handmade in Canberra and Incub8r in Brisbane.

Thanks to Natsuko, Inna and Rachel for taking the time to share their enamel experiences with me, so that I could share them with you...

Thursday, August 5, 2010

The right light

Since opening my Etsy store I have gradually improved my photo technique using my little Canon point-and-shoot, some indirect natural light and either a sheet of pearly white card left over from making our wedding invitations, or a piece of wood from our wood shed.

But sometimes the light is just not right for photos, and I am so very impatient.

For some time the photos of my orange daisy patch earrings have bugged me. Well forever in fact. I finished them too late on a Sunday, and I just wanted to get them photographed and listed, otherwise it would be days before I'd get another opportunity. However I don't think my haste really did me or my earrings any favours, in fact I think it made the earrings look quite terrible. This is the original listing here:


So last weekend while photographing some new earrings I decided to re-do the orange daisy patch earrings to show them in a "better light". I expected them to come up much better, but even I was shocked by how much a reshoot has improved the whole look of this listing:


Perhaps next time I'll be more patient... But I wouldn't bet on it ;)

Sunday, August 1, 2010

Taste of the tropics

I have a custom order for a pair of earrings. The brief was very broad, the customer chose the stones and said "make whatever you think will suit the stones". This sort of free reign is pretty rare, but I guess the reason she asked me to do this in the first place is because she likes my style of jewellery.

The stones in question are two beautiful vibrant peony pink topaz. The colours are warm and summery and made me think of my favourite flowers, the frangipani. So out came the sketch pad, and after a few scribbles a design began to emerge.


I transcribed my frangipani template onto the silver and started to pierce them out by hand. As you can see I am cutting out four frangipanis, two for my custom order and two as a pair of plain frangipanis to list in my store.

I left the 4 joined together at first as a larger piece is easier to work with. I punched guides which I would use for the drill holes, the guide marks guide the drill and stop it from skipping on the surface. As you can see from the photo where I am drilling, having the larger piece to work with is a much safer option, a small individual flower may come loose in my hand and spin up the drill bit or get thrown somewhere.


After drilling the holes I have to insert the saw blade individually into each hole of the template to cut out the inner sections. I am then ready to finish cutting each flower. Some imagination is still required here to envisage the finished earrings. I showed my son and asked if they looked like flowers and he said "nup!"

After smoothing up the edges and giving the surface an emery I stamped each earring 925 for sterling silver. At this point is was also important to invert two of the flowers in order to pair them up. Then I shaped the flowers by forging with a hammer and also tweaking with some tapered round pliers.


Finally it was time to insert the posts, which I had balled up the ends of and solder them in place. The the earrings were carefully cleanned up and annealed and rubbed back lightly with pumice a number of times to achieve a soft pearly white fine silver finish.


The frangipani studs are now available in my Etsy store.

Don't forget to come back next week to see the completed custom order frangipani earrings. And for my customer, I hope you enjoyed your sneak peak!

Thursday, July 29, 2010

Look with your hands

Today I'm thinking about texture. I have been watching my baby girl use her sense of touch to learn about the world around her. Things made for baby a very geared towards tactile sensations.

I'm a sucker for texture, we used to joke and say "look with your eyes, not with your hands". I'm one of those people that while admiring a colleagues new shirt I can't resist a quick feel of the fabric, luckily so far that has not seen me being hauled into HR for harrassment.


Who can resist the soft downy fuzz of a babies head? Or maybe you like the feeling of hands that often see a hard days work? What about the sleek coolness of a reptiles skin, or perhaps the cool crispy feeling of freshly mown grass. Back when I was at school and walking home in the summer there was one house in particular that as I walked past I'd always take off my shoes to feel the perfectly manicured lawn beneath my feet, the owner was an elderly ex-greenskeeper.

Texture is a big consideration when making jewellery too. Finishes are not just for the eyes, they evoke a mood or a feeling, lets call it a vibe!


I am working on a pair of frangipani earrings at the moment for a special order. Frangipanis are my favourite flower, I have been thinking about the soft, thick decadence of the petals and how to achieve that feeling from silver. If I get it right, no matter how dismal the day the wearer will have visions of the tropics.

Thursday, July 22, 2010

Look what I made! A blast from the past

I made a special discovery in the bottom of Amber's closet this afternoon, a discovery that resulted in me doing the strangest activity... Ironing! Anyone who knows me well will be amazed that I knew where to find the iron and remembered how to work it ;)


Over 15 years ago during HSC textiles and design at school I made a little girls sundress. I remember now that I had hung it in the cupboard before I had Jasper, it must have fallen from the hanger and lay forgotten in the bottom of the cupboard.


I was so pleased with this dress, I tie dyed the fabric, hand smocked the design, and even hand scalloped the hem (that was an insane task which took an immensely long time and resulted in many hand cramps). At the time I thought there was absolutely NO WAY I would ever let a child wear this after all the effort, for fear of it getting ruined.


But now I am looking forward to seeing my baby girl wear it. Would be a shame for all that effort to go unseen.


I think it is a size 3, so will be a while yet before she will fit into it. This time I will have to hang it more securely, otherwise next time I find it she may have outgrown it!