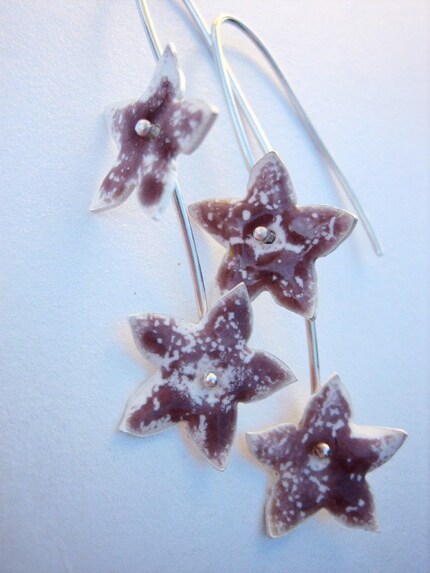
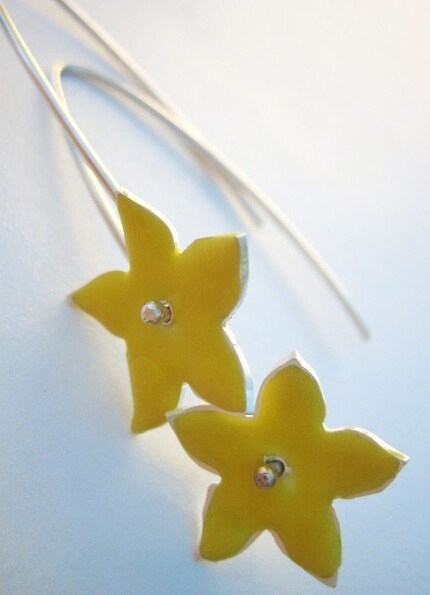
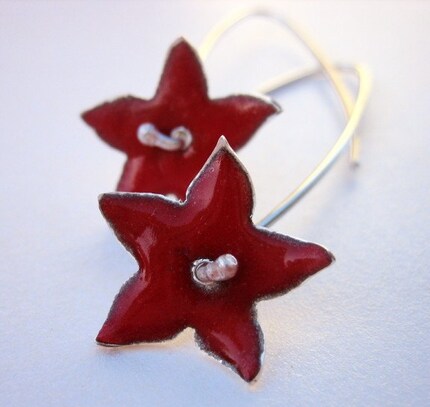
As promised I have been busy working on some new daisy pieces and have three pretty new pairs of earrings to show you. All sterling silver with torch fired enamel.
Daisy Drop Earrings in buttercup yellow
Daisy Drop Earrings in flame red
Daisy Chain Earrings in white and transparent rose purple
I have many other enamel colours so if you would like similar errings in a different colour combination just drop me a line via my Etsy store.
Saturday, December 5, 2009
Wednesday, December 2, 2009
Daytripper....
This friday will mark 3 years since we purchased our house at auction. On the day it was about 42 degrees celcius and we had only found out that morning that I was pregnant with our first baby.
I love our house and our garden, so now is a great time to show off one of our most recent additions to our garden.
We ordered our Daylilies online when we got back from our holiday in August. They arrived with their heads chopped off wrapped in damp newspaper.
We planted them that weekend, and by the next weekend new green tips were showing through.
They quickly grew up into nice green leafy plants, but having planted them so close to the flowering season I had thought we may have missed flowering this year.
However we have been pleasently surprised to find that for all but two of the varieties they have gotten in early enough to flower.
They are probably a little shorter this year, and the blooms are a little few and far between. But we have been very happy with the new additions to our garden, and there are still two close to flowering that we haven't seen yet.
As I have mentioned before my garden is a great source of inspiration for me, and this weekend I will begin work on a new daisy inspired enamel range. So as always... Watch this space!
Thursday, November 26, 2009
A moment in time....
The countdown is on until we have our second child. There seems to be so much to do and so little time. I do wonder constantly about the impact that this will have on our son (currently 2yrs and 3months) and also my relationship with him.
Last night, he lifted my top to look at my tummy, pointed and said "baby girl in there". (Note we have not found out the sex of the new baby, but Mr2 just seems very set on this 'fact'). He gave my belly a kiss then said "Night, night. I love you!" while waving to his little sibling.
I think I have been grinning all day at the thought of it. Little children can say and do the most beautiful things! I think we're going to be just fine ;)
Tuesday, November 24, 2009
Incalesco is turning 1
This Friday is Incalesco's first birthday. To celebrate I am offering 10% discount to you my blog readers.
To receive 10% discount off any item in my store simply enter the code "Blog Reader 10%" at the Etsy checkout in the Notes to Seller.
*You must follow my blog to receive the discount.
*Offer valid until 27th November.
*To receive the discount either wait for a revised paypal invoice, or pay the normal price upfront and I will refund the difference via paypal
Shhhh, please don't tell anyone....
Erin from Inner Earth Soaps is currently running a giveaway of a 3 month soap subscription.
The fewer people who know the better chance I have of winning so please keep this to yourselves! It's probably best you don't bother entering, as the soaps are really destined to be mine!
But if you have read this far and are really determined to win MY soap subscription you can enter by following the instructions at Erin's blog.
Tuesday, November 10, 2009
Art Deco Inspired
It has been on the backburner for a little while, but I have finally had the time (and the silver) to continue on with my Art Deco starburst/snowflake inspired Topaz pendant. I first introduced you to this pendant in September when I made the bezel setting.
I have now transferred the design which my hubby tidied up for me to the silver and saw pierced the design.
As much as hubby would like me to have stopped at this point, a sterling silver 'ninja star', I had other ideas!
The following image shows the components layered together and the scale, as you can see this is a pretty sizable piece, it will be a real statement piece of jewellery when completed.
After cutting down the bezel to the correct height it was time to place and solder it.
Due to the volume of silver in the piece it took a considerable amount of time to solder. If any part of the piece is allowed to cool the heat quickly dissipates preventing the solder from running.
Now it needs to be tidied up and the bail attached...
Sunday, November 8, 2009
A grand unveiling - enamel ring #1
Hooray, this weekend has been most productive (and we still have a few hours of sunlight!). I am very happy to be able to show you the first of my enamel pieces.
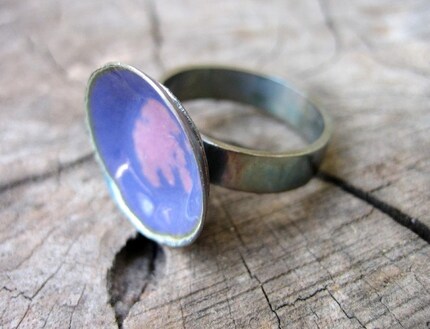
I have called this ring "Full Bloom" as it is reminiscent of the big bold roses in my front garden right now.
This ring involved a bit of experimentation, and a fair bit of luck ;) I started by first constructing the ring.
In some of my enamel test pieces I found the enamel was cracking. I had a theory that this was because I was allowing it to cool too quickly. As I had not yet perfected the torch fired enamelling and was moving on to trickier pieces with solder joins I did some extra reading. A tip that I picked up was to anneal and pickel the piece at least three times, this will prevent any potential movement left in the metal and also protect the solder from running again (hopefully!).
After annealing I cleaned the inner dome with a brass brush and let it air dry, this was to prevent any oils from my fingers contaminating the surface. I 'wet packed' the flame red enamel so that I could get it to sit up the walls of the dome.
After allowing the red enamel to dry for a couple of hours I added the dry buttercup yellow enamel.
Time then to cross my fingers and fire. I am really happy with the end result, it is available now on Etsy. Keep your eyes out in the coming weeks for some new enamel pieces in a fab range of colours.
Sunday, October 25, 2009
Experimental Enamel
As promised I got the opportunity to do some experimentation with torch firing enamel on the weekend. Previously I have only ever worked with kiln fired enamel. And while you can achieve some lovely effects a) you need a kiln! and b) it can be extremely time consuming.
So with a batch of flame red enamel I set about making some samples. I discussed 'wet packing' the enamel with the staff at my supplies shop, but they said that while it is possible the evaporation of the water can cause spitting which can be very dangerous. I opted for 'dry packing' which you can see below. Basically the enamel is sprinkled on in dust form then brushed into the area that I want to enamel.
They said to use a fairly gentle flame, which I did to start off, but my enamel instantly went black!
I had no idea if this was expected behaviour or not, the enamel was not turning molten, so clearly it should require more heat.
Anyway, I figured either way, this batch of enamel was already black so I couldn't damage it any more and continued on, finally it began to get molten.
It started to look red again, I had no idea if this was purely just because of the heat, or the pigment of the enamel.
I gave it a bit more heat until it was really nice and glassy.
When I stopped the flame it went black again.... But as it cooled it started to turn red!
Hooray, I didn't burn it after all!
I tried a few times to check the consistency of colour and experiment with different flames. Now knowing what to expect I found it was actually pretty easy. I was also able to try using flambe and flux on the back of the piece to assist with cleanup.
I'm pretty happy with my little samples, now I have to show my friend the colour swatches and see if this is the look she's after.
'Scent'sational Spring
Despite the somewhat disappointing spring weather we have had this year our front garden is out in bloom at the moment. It is full of colour and life... and inspiration!
This weekend we have two new additions, they both look and smell divine.
While we were planting these two I noticed some gaps, maybe a few more roses will be making their way to our garden in the next few weeks ;)
This weekend we have two new additions, they both look and smell divine.
While we were planting these two I noticed some gaps, maybe a few more roses will be making their way to our garden in the next few weeks ;)
Friday, October 23, 2009
Supplies Shopping
Today I have gotten organised, I arranged with my in-laws to come and mind Mr 2 so that I could duck out for a couple of hours to the city where all the supplies shops are. This means I have been able to stock up on a few bits and pieces, some that have been on the shopping list for quite a while.
I have been altering some jewellery for a friend who would like some enamelled features. I do not have a kiln at home but have been waiting to get into the city and investigate enamel that can be torch fired. I was lucky that my regular supplies shop has in fact just got in some American Thompson enamel that is lead free and can be torch fired.
I will do some experiments first before I attack my friends jewellery, but I hope to have some test pieces to show you soon. I also got a nifty tripod, as when you torch fire enamel you have to heat from below. I have just got one colour to play with now, I'll see how much I enjoy torch firing before I race out and get any more colours.
I have also stocked up on some more Sterling Silver. This time coming home with 1mm plate, 0.6mm plate and 3mm round wire.
I checked out some of the things on my wish list too, unfortunately none of them were on super duper 75% off sale or anything that exciting. And none of them came in at under $280 so they all remain wishes for now ;)
I got home to find that Mr 2 was sound asleep, Nanna must have the magic touch ;) or Pa wore him out! Anyway, on that happy note I whipped up a pear and fig loaf which smells like it is almost cooked.... Mmmmmmmmm
I have been altering some jewellery for a friend who would like some enamelled features. I do not have a kiln at home but have been waiting to get into the city and investigate enamel that can be torch fired. I was lucky that my regular supplies shop has in fact just got in some American Thompson enamel that is lead free and can be torch fired.
I will do some experiments first before I attack my friends jewellery, but I hope to have some test pieces to show you soon. I also got a nifty tripod, as when you torch fire enamel you have to heat from below. I have just got one colour to play with now, I'll see how much I enjoy torch firing before I race out and get any more colours.
I have also stocked up on some more Sterling Silver. This time coming home with 1mm plate, 0.6mm plate and 3mm round wire.
I checked out some of the things on my wish list too, unfortunately none of them were on super duper 75% off sale or anything that exciting. And none of them came in at under $280 so they all remain wishes for now ;)
I got home to find that Mr 2 was sound asleep, Nanna must have the magic touch ;) or Pa wore him out! Anyway, on that happy note I whipped up a pear and fig loaf which smells like it is almost cooked.... Mmmmmmmmm
Sunday, October 18, 2009
At last, a finished piece!
Finally, after weeks and weeks of work in progress, I have actually got a finished piece to show. And it is not one of the works in progress I have previously shown you!
I would like to introduce the Serpent Bracelet.
In 2006 while studying I did some snake scale inspired press forming. The pieces were put together in a glo-mesh style configuration. While I loved the look, the overall construction was flimsy. I decided to put my 'snake skin' into the partial box for later use.
The sample has been given new life as often happens. They sit in the 'partials' box waiting for inspiration to strike. The tabs have been removed and each scale is now joined with a jump ring.
The surface of the soldered bracelet has been brushed with a brass brush to give a soft finish. Then the whole piece has been very lightly oxidised, just enough to give the fabulous range of colour you can see pictured.
The Serpent Bracelet is available now in my Etsy store.
Sunday, October 11, 2009
Peppermint Crisp - A new work in progress
I had a couple of setbacks this weekend which has resulted in me putting aside the pieces I was currently working on and starting a brand new one. I generally like to have a few pieces on the go, but hopefully I may get to finish something before I start anything else!
The topaz pendant I had planned to work on this weekend will hopefully get back in motion next weekend, after I pick up some more silver. The piece I had planned to use was not quite big enough. Sadly the sqaure cut amethyst that was to go in the knife edge ring met an unfortunate end, I will need to put that one on hold until I order some new stones.
So on to the new piece! This one had a name from the moment I started, inspired by the gorgeous octagon cut 1 carat green tourmaline I am using.
It reminds me of those crispy mint pieces you get in some chocolate bars, mmm chocolate...
This one will be paired with a nice solid sterling silver ring with champhered edges reflecting the cut of the stone.
It will be set in a nice little basket which I am yet to make.
Friday, October 9, 2009
Hello Bella Moon!
Today I have dropped off a number of pieces, including many of my one of a kind works at a gorgeous new store in Brunswick.
Bella Moon
Shop 2, 341 Sydney Road
Brunswick, Victoria, 3056
It was an absolute pleasure spending a couple of hours with Marti this afternoon getting the stock all setup nicely, she has given my work a wonderful position right in the middle of the front window. It was great to see people stop and look!
The shop is beautiful and bright and inviting, everything is presented beautifully. As well as jewellery Bella Moon sells other products like Handbags, scarves and hats. Marti also makes some of the jewellery herself. It's well worth a visit!
Subscribe to:
Posts (Atom)